Asus EeePC review

Computer Tips, General Comments 1 Comment »

Not a review as such, more of a report about day to day use, really.. I’ve had my EeePC since Christmas day, so not so much of a well worn user test as a first impressions kind of thing.

And first impressions are very very good indeed! OK, so the screen is a bit small, but it is bright and clear and very usable. The keyboard is the toughest thing to use, IMO as the keys are soooo small, and one or two seem a little out of place – the right hand shift key, backspace and one or two others. However, these are small issues, and really not worth dwelling on.

I have a 2Gb SD card pretty much permanently in the slot so as to have that little bit more storage, but with the price of USB sticks falling so fast it won’t be long until I slot in a 16Gb one internally, I think. Thiswil, of course, require some internal surgery, but others have already done similar by mounting a USB port in some space inside the machine. This *will* invalidate the warranty, but could be a useful addition and make the EeePC even more usable for day-to-day stuff.

Just tonight I installed ‘Fire FTP’ as an add on to Firefox and it is lovely – I can now get in to the servers I need to get in to without having a new app taking up space.

Battery life when asleep isn’t tremendous, so don’t leave it a day or two and then think it will work without power… it won’t, but all in all the power is pretty good. Remember to charge it up!

You absolutely really *must* enable the advanced mode to get a standard desktop type experience. For those not sure, you need to delve a little into the terminal, use ‘apt-get’ to download two things and hey ho, you’re away. The advanced layout is very familiar to anyone who has used a windows machine but is somehow… nicer. The EeePC will revert to standard (easy) mode if you re-start, so I need to find a way to prevent that happening.

I know that there are plenty of mods around, and even though he has had it but a few days, my colleague Nick has added a touch screen which looks and behaves perfectly. I may have to do that to this one… although not yet. I can’t help thinking a touch screen would be easier to use, mind you.

This entire entry has been typed on the EeePC and there may be some errors in what I am typing. Sorry… I am sitting in a small hotel room in Bayswater, London, getting ready for the BETT show tomorrow. It’s late, but not late enough to prevent me turning the Asus on one more time! There you go… I’m hooked on this lovely little device… :-)

Voice over IP, VoIP, Sipgate

Cleveratom, Computer Tips, Networking, Voice over IP 4 Comments »

sipgate logoA little while ago I wrote about the joys of using VoIP for our office communication, and you can read that here. By way of an update I want to explain how we have got four office phones working on one Sipgate line, and why we even tried.

First off, it should be noted that the good folks at Sipgate were the ones who pointed the way – all I did was take their information and advice and apply it, although there was still some working out to do… I couldn’t have got close without their support, which has been excellent.

The issue is that small businesses pay through the nose for a telephone system when really they don’t need half of the stuff they are buying in to. In our office, we need a phone system that rings, allows a call to be transfered to another phone on the network, allows an outgoing call at the same time as an incoming call, and allows multiple incoming calls. All of this is possible without having to use a VoIP system any more complicated than a number from Sipgate. To get the system running we bought four entry level Grandstream Budgetone 101 phones which have a very basic level of features. In fact, Grandstream class these as consumer level phones.

The way it works is that the Sipgate connection acts a little like a trunk. You can pass data along it up to the capacity of your internet connection and that data can flow either way. A full duplex (two way) VoIP call will use approximately 100Kbps of data per direction and therefore on a standard 8Mb ADSL line, with 835Kbps upstream you can get about 8 full conversations running if you are not using the line for anything else. That is fine – we only need a maximum of 4 or 5, hence four phones were bought.

The next piece of the jigsaw is in the way you configure the phones and your router. You *must* be able to set up port forwarding on your router or else this won’t work – each phone uses two ports, one for SIP and one for RTP, and these need to point to an individual IP address on your network… more on these later. You also need to be able to configure each phone to use a different port.

So, assuming all is well, you plug in your first phone and let the router assign an IP address to it. Check your router to see the new device that is attached and note the IP address that is assigned (or use the menu on the phone to see it there). You then log in to that phone using a web browser by typing the IP number into the address bar. If your network is like ours, the router will assign an IP similar to 192.168.0.20. When you type that in you should get a log in screen. The BT101 has two level of log in. a restricted access account would use the password ’123′ whilst a full access account would be ‘admin’. You can change these once logged in.

BT101 configuration
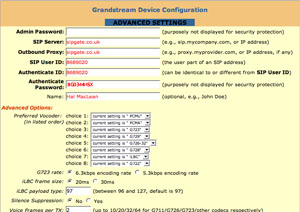
Go in as ‘admin’, go to the advanced settings tab and fill in all of the fields. If you, like us, have a sipgate account then you can log into that in a different browser window, go to help and support and get all of the settings you need displayed in a page that replicates the phone admin screen. This is superbly useful! Simply copy and paste between the two. You don’t need to change any other settings in the page (but obviously, if you know what you are doing then you can play to your heart’s content), although you must remember to put in your Sipgate username and pass code. When you do the phone can connect to Sipgate and register on the system. Note the settings about halfway down for SIP and RTP ports – these will be at the default.

sip phone config 2
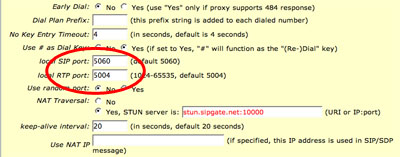
All being well, the phone will be live immediately and you can make and receive calls. Now for the second phone. Plug it in as before, let the router do it’s thing and then dial in to the new IP address using a web browser. It will probably be one more than the last time: 192.168.0.21, for example. Enter all of the settings as before, except this time change the SIP and RTP values to be 5160 and 5104 respectively… all else stays the same. You are not done yet, mind you – now you need to get into your router.

Log in as you would normally (in my example, it would be 192.168.0.1 probably) and go to where you set up new services. Add a new service, and call it ‘phone2′. Set it to be TCP/UDP and set the port as 5160. Now go to the ‘firewall rules’ or wherever you set up port forwarding. In there, select your new service from the list and map it to the IP address of the phone. You may also need to use the phone’s ‘MAC’ address. This is a sequence of pairs of characters separated by colons. You can find it by going to the router’s page for ‘attached devices’ usually. You now have one port set up to go to the phone directly… you have to also set up the other. Go back to the services list and create a new one, call it ‘phone 2a’ or whatever you want. set it to TCP/UDP and make the port 5104. Now, back to the firewall rules and do as before – map that port to the same IP as before.

Back in the phone configuration under the ‘basic settings’ you should allow the phone to get is’s IP through DHCP. What happens is that the router will detect the ‘MAC’ address of the connected device and use the list of reserved IP’s that you have created by setting up the rules. It will assign the phone the same IP address each time you connect it to any network port. Additionally, any information coming on an any of the ports you have requested will be forwarded to that same IP… in other words, that phone will ring.

If you now go back to your Sipgate account you will see there is a list of registered devices, and each has a different port number assigned to the same sipgate telephone number. In our case there are four devices, as we set up four phones and made firewall rules for each, and set up port forwarding (two ports per phone) for each. In the example above, there would be two devices listed, with two ports each.

What happens now is that when a caller rings you on your sipgate number all of the phones will start to signal the call. If you pick up any one of them (the others may ring on a second or so, but then stop) you will answer the call as you would expect to. However, if a second call arrives at the same time then the remaining phones will ring, leaving the original call on the line. This will continue until all of your phones (or all of your bandwidth) are being used. You can also have someone ringing out whilst others are answering incoming calls.

From here on, the other features you need, such as call transfer, are probably features of the phones you are using. Most IP phones will have a ‘Transfer’ button which works by you answering a call, pressing ‘Transfer’ and dialling the IP extension number. Note that the IP number is important – you have to dial it in full, as four sets of three digits. So, if you want to reach the phone on 192.168.0.21 you actually dial ’192168000021′. of course, if you spend a bit more money than we did, you could get a phone which allows you to store numbers in it and use those to stop having to dial such long numbers each time.

At the moment, Sipgate don’t support call transfers in the traditional sense, but some phones will still work nonetheless.

The upshot of this incredibly long post is that you really *don’t* need a complex and expensive VoIP system if you only want a few phones in your office. You may want to use ‘Asterisk’ as an open sourc IP PBX system, and that’s great – but you don’t need to if you want to keep things simple. of course, in a busy call centre you’d be mad not to invest in something a bit more sophisticated! For us, this simple set up is working well, and today we had two simultaneous incoming calls and one outgoing call with no perceived loss of quality, internet access of slowdown of data transfer over a single ADSL 8Mb line.

Once again – thanks to the support team at Sipgate for pointing the way… it isn’t a job for the feint hearted or those not familiar with the inner workings of their router. Note that our router is a pretty standard Netgear model… nothing fancy, and definitely the sort of thing a lot of folk would have in their home set up these days.

Telephony on the cheap? You betcha!

File size limit Fat32, NTFS

Computer Tips 2 Comments »

For some unknown reason I was caught trying to transfer a 4.2Gb file from a WInXP laptop to a WinXP desktop. I went via my trusty Mac, since I needed a machine with a DVD burner to create a backup of the file.

Creating the DVD was, naturally, a piece of cake. Getting it onto the desktop of the PC was not.

Why, oh why, oh why….

It wouldn’t go, no matter what. Every time I tried I got a ‘not enough space’ warning. Even when I opened the DVD it showed the file size as 2Gb and not the full 4+GB it was showing as on the Mac.

Sigh.

The XP laptop was installed on a NTFS partition. On the desktop it was on a FAT32 partition.

’nuff said.

Network Mac to PC, share files between Mac and PC, cross platform network, mixed platform network

Computer Tips 5 Comments »

I wrote an email to a bloke called Simon and tried to explain how to network a Mac and a PC together. This is one of those things that is in fact easier to do than to explain, but it isn’t a straightforward process by any measure.

The email I wrote relied on there being a router involved and both machines connected to it, receiving DHCP addresses from it. The instructions on doing this bit are usually included with your router and would probably be part of the initial set up that you go through. From there you need to follow the steps here to get it all running.

I am using Mac OSX 10.4.x and Win XP Pro, but it works the same with Win XP Home. This is what I said:

Part 1

OK – if you have OSX 10.2 or above this is going to be a piece of cake. Without going into the detail too much, when you network two computers they need to be in the same ‘group’. By default, a MacOSX machine is placed into a group called ‘workgroup’. However, a Windows machine by default is in a group usually called MSHOME. You can choose to change either or both to be the same.

In Windows (XP), click on control panel, then System. In the box, click the tab for computer name, then look for the button to ‘Change’ it. In there you can type ‘workgroup’ for the group – it will only go in as capitals. You will need to re-start the machine to apply the changes.

Or, in Mac, open your applications/utilities folder and start up ‘Directory Access’. You will need to authenticate – click on the lock and type your password. In the list of services highlight the one with ‘SMB/CIFS’ and then click on ‘Configure…’ – you can now type in the name for the workgroup that you want. You won’t need to re-start!

Personally, I leave the Mac as Workgroup and change the PC to be the same. With luck this is all that you’ll have to do… apart from set up a shared folder. For lots of reasons I only ever share a folder on a PC, not the entire drive. Create a folder, name it and right click on it. In properties, set up the share name there. On the Mac, go into the System prefs and under ‘Sharing’ click on ‘Windows Sharing’. The Mac will tell you the path that other users can use to get to your machine, so make a note of it – it will be something like \\192.168.1.10\username.

Part 2

The next step is to make sure that you can ‘see’ the PC from the mac and vice versa. Ensure that your network cables are connected to your router and that both machines have Internet access – open a browser and check a search in Google, for example. If you have set the router up properly this should be straight forward, and the router should be supplying ‘DHCP’ info for both the PC and the Mac.

You need to know what the IP address is for the PC – you can get this usually from the router’s internal info or from the PC itself. Depending on the router, log in (could be 192.168.1.1 or 10.0.0.1 as the address to log in to the router – type this into Safari or Firefox), and look for the ‘DHCP assigned routing table’. In there you will see what each machine connected to the router has been assigned. If you prefer to use the PC, go to the start button and then click on ‘Run’ and type in ‘cmd’ – this starts up the command line prompt in a window. Once there, type ‘ipconfig’ and you should see the IP address that the PC has been assigned.

If that all works, on the Mac go into applications/utilities and start up the Network Utility. Click on ‘Ping’ and type in the IP address for the PC. If all is well, the Ping will start and you should get ten results under 1ms. You can do the same to the Mac from the PC – go into the command line again and type ‘Ping’ and the IP address for the Mac…

If you can ping both machines successfully, there is no reason why you can’t now mount the shared volumes with ease.

Part 3

On the Mac, open a finder window and on the top left click on the ‘network’ icon and browse to ‘servers’ – you should see the PC listed there – click on it and click ‘connect’. You will be prompted for a user name and password – the username is typically the name of the account you created in win XP. If you use a password, type it there. The list of available shared volumes will appear, click the one you want. If there is only one it may not give you the option, so check to see if a network icon appears on your desktop. If you arrange the desktop view by name it will appear under the hard drive icon in the top right of the screen.

That is full access to the PC shared folder, and you can simply drag and drop stuff into there or from there.

On the PC the Mac should now appear in the Network places. You could click on the ‘Show Workgroup’ icon and browse for it if not. However, if you can’t find it, you may need to ‘Add a network place’. To do this you’ll need the info you noted down earlier when prompted by the wizard. This will then give you an icon in the ‘My Computer’ area which will link to the Mac and will be called something like ‘username on MacOSX (computername or share name), so for me it is ‘Hal on Mac OSX (Jumbo).

Again, you’ll need your Mac OSX username and password (the one you use for admin stuff, like installing apps), and then the mac folders will appear for you… simply drag and drop files to and from whatever folder you need.

——-

After that I guess it is time to open up any bottle of something nice to drink that you have got lying around. I would think I might have missed some bits and pieces out, so feel free to let me know if I have.

ADSL gateway router wireless, D-Link, Linksys, Vigor 2200USB

Computer Tips No Comments »

I first got an ADSL broadband connection in August 2001 and was pleased to receive a green frog type Alcatel ‘speedtouch’ USB modem. This was going to be the answer to my prayers, but soon turned into a bit of a nightmare.

I use a Mac G4 desktop computer and a PC, both of which (naturally) have USB ports and both I wanted to connect to the Internet. Back in 2001 I was working in OS9, even though OSX was just about available. With OS9 I had a chance of setting up the connection for the speedtouch modem and using the mac as a gateway – sharing the internet connection with other machines on the network.

Hah! Network! That brings a wry smile. In 2001 OS9 didn’t actually talk with Windows, and to pass files around needed you to either FTP them across or use a third party piece of software such as ‘PCMacLan’ or ‘Dave’.

To cut a long story short, the Speedtouch drivers didn’t work with OSX, but were fine with the PC. They were, at best, iffy with OS9. Since the modem has a USB connection to join it to the computer there was no way to actually get a router involved, until Vigor released the ’2200USB’ router. This had two USB ports and was designed for just this kind of situation. Glorious! At last I could use a simple ethernet wire between the router and the different machines, rely on DHCP for the addresses and not have to concern myself with the sharing of the connection – the router handled all of it. What a great piece of kit!

Over time my needs grew and I discovered the joys of wireless networking – I added a G4 Powerbook to the line up of gadgetry, since this had been supplied by work. Of course, the Vigor router doesn’t have a wireless access point, so off I went, cash at the ready, to buy a WAP… I settled on a charming little ‘Netgear’ number. Despite needing a PC to set it up, it was a good deal cheaper than the Apple ‘Airport Basestation’ option. Within a very short time I had a fully working mixed platform network.

I could also now move over fully to OSX and did so with relish! OSX enabled me to ‘talk’ to the PC and at long last, some resemblence of file sharing appeared.

And so it stayed for several years. Occasional firmware updates arrived from Draytek for the Vigor 2200USB and all has been well.

All well, that is, until I noticed that there was an unusual computer listed as having a DHCP address in my Router’s management set up. Hmmm… could it possibly be that someone has detected my WAP and found a way in? Easy enough to do, of course – I didn’t have a password protected network! So, I decided the time was right to upgrade the firmware once more and set about password protecting the network.

And that’s when the troubles began. The latest firmware update seemed to kill the USB ports on the back of my beloved Vigor router. I took the speedtouch modem and connected it directly to the computer and it worked, but not a single thing happened when connected to the router itself. Had I somehow fried the ports? Sigh.

So – thinking that I had too many plugs in too many sockets, and more than enough wiring which was beginning to make spaghetti look neat, I decided to buy a new router with a built in WAP. I chose the D-Link G604T.

Installing it was a breeze – it needed just a couple of settings via a browser on the mac and I was up and runing – the wireless network was humming along at the improved speed of 802.11g (54Mbps) and all semed well. Time to turn on the PC and make sure that wors, too… but it didn’t. The PC couldn’t connect out to the web at all, and strangely it stopped the macs connecting via a web browser as well. On the macs, iChat worked fine and even the internal mail client, First Class, continued as usual… just no web browing. To get it back I had to keep re-setting the router, so I knew this couldn’t be right. I called tech support, who were, to be fair, very helpful. However, try as we might it was just not going to work, so I took the router back to PC World from whence it came, and exchanged it for an identical one.

Sadly this too was no use – I was ��80 down and no nearer finding a solution – D-Link kept telling me their routers were fine, and I was finding that not to be the case. I went into work the next day, rather than work from home, and decided to find an alternative router.

I found the Linksys WAG54G. Perhaps not as pretty as the D-Link model – plus it wasn’t a space saving ‘upright’ model, but right out of the box, with the bare minimum of fuss it was up and running as robustly as you can want. And the PC was fine too – I diodn’t change any settings, it all just worked. Now that’s what a router set up should be like, in my opinion! Three cheers for Cisco!

By now, of course, I had contacted Draytek to ask why the firmware had caused this, and so far I haven’t found out. A couple of emails later – asking me to re-apply the upgrade – and I am still no nearer resolving it. Draytek so seem a good and helpful bunch of folk, mind you, and the product worked flawlessly for nearly four years – always on, always no trouble at all. If I have to return it to get it fixed then I will – it would be handy to have around ‘just in case’, but until then I am over the moon with the Linksys router. Less wires, less hassle, less plugs in sockets, so over all less stress.

I’ll let you know how it goes.

Oh! And PC World in all this? They couldn’t have been nicer. The first time I went back on the advice of D-Link and they exchanged the unit right away. A day later I returned the new unit (again after talking with D-Link) but this time asked for a refund. There it was, seconds later, back in the bank where it should have been all along. I normally give PC world a panning whenever I can, but on this occasion they were great.

WP Theme & Icons by N.Design Studio
Entries RSS Comments RSS Log in