Moodle Competencies, Moodle grading scales, When it all goes wrong…

I am working with a client using Moodle and they wanted to implement competency based assessments. That’s all fine, I thought, and went about setting up the competency frameworks in Moodle, and then adding the scales to asses (from ‘beginner’ to ‘Expert’ or thereabouts).

Moodle has a slightly odd approach to scales in Competencies – you create the scale in one part of the interface, and then apply it and configure it in another.  You basically add all of the possible items for your scale as a comma separated list, and then select it as the scale to use for your competencies… and configure which of the items is the ‘default’ to assign unless changed by an admin, and which of the items signifies ‘proficient’. Think of a two part scale – not proficient, and proficient… one would be the default and the other would be used to signify the person has attained proficiency…

Now apply the same theory to a four part scale, where every item shows proficiency, but at varying degrees. For example, a scale like this: “Learner”, “Intermediate”, “Proficient” and “Expert”. All of them show a level of proficiency, but not the same level, which is fine.  The lowest item would be the default for the scale, so anyone assessing a piece of work would see “Learner” selected, and go from there if they thought it warranted a higher level.

And here’s where it gets wierd. When you assign a scale to a competency framework in Moodle, you need to configure that scale to show those options in the way you want. There is no ‘Save’ button when you check the boxes you want, so you just ‘close’ the window, and then ‘Save’ at the bottom of the page instead. If all is well, Moodle takes you to the competency framework page to add/edit/ content. However, in every single case I’ve ever tried, it just gives me an error:

“The scale needs to be configured by selecting default and proficient items.”

No matter what I do, with two items, four items, one item on the scale… nothing actually works. Not sure if it is a bug, a permissions issue or something I’m doing wrong, but it just refuses to accept the input I make on the form.

If you’re getting the same, here’s how to fix this. Go into your database (if you can… many Moodle admins won’t have access to this, but you’re going to need it), and find the table called ‘mdl_competency_framework’. In there, you’ll see the “scaleid” field which gives you the ID number for the scale that the framework you’re creating is actually using. You can check this ID number pretty easily by looking in the ‘mdl_scale’ table. Next to that you’ll see the field showing the options that are being applied, and you can edit those options. They look a bit like this:

[{"scaleid":"2"},{"id":1,"scaledefault":1,"proficient":0},{"id":2,"scaledefault":0,"proficient":1}]

It looks off-putting if you’ve never seen it before, but it’s actually really easy to understand.

  • “scaleid” is in fact the ID number of the scale to use – you can change it, just by changing the number. However, if you do that, and the scale you set has a different number of options, then you need to add more to this string of text.
  • “id” in the second set of parenthesis is the row on your scale. Row 1, at the top when you went to configure it as a value of ‘1’.
  • “scaledefault” sets whether this item is the default for the scale or not – ‘1’ means yes, ‘0’ means no.
  • “proficient” is whether the item is to be considered as proficient or not – again, ‘1’ means yes, ‘0’ means no.

The second set of parenthesis is exactly the same but for the second option on your scale. So… what if you have more than two items on your scale? Copy the same format and extend it with more sets of parenthesis… For example, add a third set of parenthesis for your third option on your scale, remember to use a comma between each set of parenthesis:

[{"scaleid":"2"},{"id":1,"scaledefault":1,"proficient":0},{"id":2,"scaledefault":0,"proficient":1},{"id":3,"scaledefault":0,"proficient":1}]

Note that the “id’ for the third item has changed to ‘3’ and it is not the default (because of the zero) but is something that could indicate proficiency.

As it happens, my simple scale had four options, so I needed to make four sets of parenthesis. Making sure I knew the ID for my scale, it became this (remember to put the comma…):

[{"scaleid":"3"},{"id":1,"scaledefault":1,"proficient":1},{"id":2,"scaledefault":0,"proficient":1},{"id":3,"scaledefault":0,"proficient":1},{"id":4,"scaledefault":0,"proficient":1}]

Basically saying, the first option (“Learner”) is the default, and yet every other option, if selected would indicate a level of proficiency.

After saving this back into the database, I refreshed the moodle page and went to configure the scale… lo and behold, it worked:
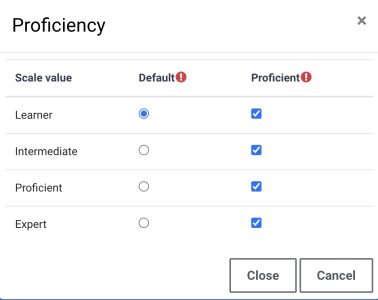


So, the scale is created within the Moodle Site Administration -> Grades section, and is really just a comma separated list. Then you can choose the scale you want when setting up your competency framework, and it is in the competency settings that you configure how the scale will work.

Now, I’ve no idea why the moodle page won’t allow it, but the only workaround I could find was to edit directly in the database. You may be lucky and find it works ok for you, but if not, it’s time to load up PHPMyAdmin (Or whatever your preferred tool is) and dig into the Moodle tables!

Philippines Travel Tax for Foreigners – TIEZA, e-Travel, Exit Clearance

This one often causes a few confused looks amongst the ex-pat communities! The TIEZA travel tax is a tax that every Filipino must pay when they leave the country. It’s calculated based on your ticket class… first class pay more than business and economy seats, but it is payable for every journey.

If you visit the Philippines as a tourist, and leave within the normal tourist visa provisions, or even if you’ve had it extended, the TIEZA does NOT apply to you. You do not need to pay it and may simply leave the country. However, if you are a visa holder of any other type (working, marriage, etc), they it’s a little less clear – you *might* have to pay it… but not always.

I have a working visa (9G) and have had many journeys out of the country and back, and have always paid it no matter what. It’s around £20.00 or so, which is not dreadful, but seems quite punitive. On my last trip out I was told at check in (after already paying it online) that it was not necessary. I did not understand why, so today took the opportunity to talk to someone working at City Hall who collects this tax.

It turns out that you only need to pay it if you hold a non-tourist visa, and your last travel was over a year ago. Let me write that again… you only need to pay it if your last travel was over a year ago. More specifically, your last date of entry to the country was over a year ago… so if you arrived in August after a short trip to Hong Kong, then you want to go to Thailand in October, you do not need to pay it again for the Thailand trip… it applies to for a year, based on the date of your last entry to the country.

Now, I am going to go back and ask that same question again from City Hall, because it seems to me that if I left the country having paid TIEZA, then returned, and then took a series of flights every 5 months or so, the date of last entry would never be a year ago, so it would seem no TIEZA would be payable. That doesn’t seem right – for a country so obsessed with making you pay for every single item ever, missing out on the TIEZA payment because of a quirk in the rules would be beyond unusual! After all, my 12 month visa is only ever 9 months, and to get 12 months I have to pay for an ‘extension’ even though it’s within the original 12 months. They’ve got that one well and truly sewn up… so I will go and double check TIEZA rules for you, and report back.

Don’t confuse TIEZA with the other forms of payment you need to make as a visa holder. For example, despite paying for a 12 month visa and getting around 9 months, that visa payment does not give you the right to exit and re-enter. The visa gives you the right to apply to exit and re-enter only. If you actually do exit and re-enter, then you pay a different levy at the airport before you go to immigration – you have to have an ‘Exit Clearance Certificate’ and they cost around php2,300 (roughly £35.00 or so). This certificate is printed on lightweight paper that doesn’t fit in any envelope that you may or may not be carrying, and you absolutely do need it when you return. It is clearance to say you have no outstanding debts to pay, etc – although they don’t actually check that. So, a visa gives you the right to stay in the country, and apply to leave, but to actually leave you need an Exit Certificate, and if your last date of entry was over a year ago, you also need to pay TIEZA travel tax.

Oh – one more thing – thanks to the Covid pandemic, you also need to apply for a health declaration – this is actually free, and is done entirely online. You get a QR code to show when you leave, and you must apply for an entry code no more than 72 hours before you come back.  This is the ‘e-travel Pass’ and has to be completed by everyone – it’s a bit like the old arrivals card you had to complete in days gone by. It’s actually a record of your passport, travel arrangements (flight number, etc) and a declaration that you’re healthy to travel. On arrival you also state your residence when in the country… but, at least that part is free!

Tourists – leaving within the tourist visa time scale – no TIEZA, no exit clearance
Tourists – leaving more than 3 months since arrival – no TIEZA, but you MUST pay the exit clearance. Worth also checking if you need police clearance to say you’ve got no debt – do this a week before travel at the very latest, and make sure that week allows plenty of time with no public holidays. You can initiate this check at the local BI office near you, you don’t need to go to the main BI building in Intramuros

Visa holders – leaving within a year of your last date of entry – no TIEZA (I will check this)
Visa holders – leaving more than a year after your last entry – PAY TIEZA (https://traveltax.tieza.gov.ph/signin)

Visa holders – returning to the country – PAY the Exit Clearance Certificate in the airport, near the immigration desks, and keep that puppy safe for when you return – you will need to show it.

ALL passengers – complete the e-Travel declaration (https://etravel.gov.ph/)

Import Tariffs and Customs Duty in Philippines – thank you, FedEx!

This week I have mainly been finding out about how customs duty and tariffs work when buying items from eBay. It turns out that when you buy small items from overseas (in my case, Japan) and ship them to your home address, they attract little or no interest. However, last week I made quite a big purchase to add new pads to my eDrum kit. I bought from eBay, from a seller in Japan (as I have done for many other items) and the seller shipped through FedEx.

Sure enough, FedEx impounded the goods and requested repeated copies of the sales receipt and proof of payment. In all I sent the same paperwork to three different people over five days and each time I re-sent, I was told they could not recover the files from the other person and so I had to re-send. C’mon, FedEx!!! What sort of game are you playing?

Ultimately it seems I triggered some kind of threshold beyond which excise duty is payable. I thought if the items were for personal use that was not going to attract any tax, but it turns out I was wrong. All goods coming in to the Philippines from overseas are subject to customs duty – with the small exception of household goods and items brought in by anyone setting up a home here. However, it also appears to be true that not all goods are subject to this tax, and I have bought multiple times from Amazon in Japan, eBay, and also the local markets here teeming with Chinese sales sites (Lazada and Shopee, both of whom seem to allow imported goods from China and none of which appears to get caught at customs).

Perhaps FedEx is the exception here – and all other delivery companies should be doing the same, but it does seem that FedEx is the only company checking goods inwards. Perhaps also it is the cost of those goods being higher than average, or the fact that there were 4 items all the same that suggested I was stocking a shop and selling them? I don’t really know, but all in all it cost about US$120.00 to import US$600 of items. If VAT is 12% in the Philippines, then at least $72 was for that… which I guess means the excise duty was bearable.

Just be aware – if you’re in Phils and buying items from overseas, shipped through FeDex, with a high net value, you’re going to be hit for the tax. It’s probably not only the Philippines that does this, and maybe local trade agreements and so on ease some of it.. but there is very little information online to help understand this, which makes it all the more mysterious!

Apple AirTag not found when battery is replaced

Sometimes it is one of those small and annoying things that disrupts your thinking much more than it should. For me today it was my Apple AirTag that resolutely refused to be ‘seen’ by the phone once I’d replaced the battery on the AirTag (a whole different story, involving mole grips and swearing).

It turns out that what I had to do was reset the AirTag. Quite how to do this is not particularly obvious, as there are no buttons switches or ports on the AirTag itself.

What you do is remove the cover (reaching for mole grips again…) and remove and replace the battery four times in succession, then do it once more. Each time you replace the battery (don’t bother putting the cover on) the AirTag makes a reassuring beepy sound. The final time is where that sound is different to the first four, and that’s when you know it has been reset. Try to add it as a device to your phone within the ‘Find My’ application and it *should* show up, allowing you to configure its name and connect it to your apple account.

Apple published this sequence for you:

Here’s how to reset your AirTag:

  1. Press down on the polished stainless steel battery cover of your AirTag and rotate anticlockwise until the cover stops rotating.
  2. Remove the cover and the battery.*
  3. Replace the battery.
  4. Press down on the battery until you hear a sound. This sound means that the battery is connected. 
  5. When the sound finishes, repeat the process four more times, removing and replacing the battery, then pressing down on the battery until you hear a sound. You should hear a sound each time you press on the battery, for a total of five sounds. The fifth sound is different from the previous four. This indicates that the AirTag is now ready to pair.

Now all I have to do is make sure it is added. Don’t look in the ‘devices’ list… it’s not a device… it’s an ‘Item’ so switch the Find My view to show items, and you’ll see it there. I think it is an ‘item’ because it is supposed to be placed with an item such as a wallet, or bicycle, or car… so you need to look for the item and not a device.

Simple – the kind of simple that Apple likes us to believe in? Nope. Not as simple as it could be… see YouTube for videos on how to lick your battery, how to make sure you don’t use Duracell batteries, what not to do, what to do… and the very fact all these videos exist is testament to the level of difficulty owning an AirTag presents to you.

Now, about those mole grips… you simply cannot ‘press down and rotate’ the back of an air tag with your hands. At least, not mine. Anything less than a set of grips and you cannot open the beast!

Roland V-Drums Wiring Loom Pins – you may not believe it when you see it!

This weekend I had reason to investigate the way the cables on a Roland electronic drum kit are wired to the connector block. If you’re unsure, I mean the wiring loom that comes with nearly all electronic kits and connects the various trigger pads to the digital ‘brain’. Only a few Roland kits don’t use this method of connection, relying instead on individual cables with 6mm jack plugs. The many kits that do have the loom (from TD-01DMK through to the mighty TD-27) usually have a variety of pads with either single triggers or dual triggers, hence the loom itself is made up of what appear to be a mixture of stereo and mono cables. If you’re not sure, a stereo cable appears to have two black rings around the jack, and a mono only has one, as you’ll see in the picture.

In fact, the stereo cable has three connectors on it, separated by the black insulating rings, and the mono cable has two – meaning inside a stereo cable are three smaller wires and inside a mono cable are two. The ‘anatomy’ of a jack plug is either ‘TRS’ or just ‘TS’. That’s ‘Tip’, ‘Ring’ and ‘Sleeve’ for Stereo or just ‘Tip’ and ‘Sleeve’ for mono. You can easily pull these apart and see the soldered wires connecting to each part of the jack itself. The ‘tip’ and ‘ring’ connectors are generally the ones that signals go along, whilst the ‘sleeve’ is normally a ‘ground’ wire that does not carry a signal to the ‘brain’. Thus a stereo jack can carry two signals, a mono cable carries one, but both types of jack need to be ‘grounded’.

On the other end of the cable is a 25 pin D-type connector, similar to the ones we used to see on computer printers before USB became the standard connection type.

An electronic drum kit has ‘sensors’ or ‘triggers’ – basically, combinations of piezoelectric transducers and switches. A ‘piezo’ is simply a small electronic device that converts pressure (such as from a drum stick striking the drum surface) into electrical signals. Using combinations of piezos and switches, it’s possible to assign individual sounds to each, and a combination sound if they are activated simultaneously. The Roland wiring loom only uses stereo and mono cables, so each pad can have a maximum of two triggers, or only one. It won’t surprise you to learn that the wiring loom has five of each jack type, because simple mathematics tells us that this equates to 25 individual wires connecting to the 25 pins in the other end (3×5 = 15, and 2×5= 10, making 25 in total). This allows pads like a snare drum to use a stereo cable and get three different sounds, whilst a kick drum only needs a mono cable because it’ll only make one sound. The strength with which the pad is struck is also able to be detected, and this ‘velocity’ factor can help adjust the sound accordingly. A gentle tap on the snare top produces a ‘ghost’ note, whilst an almighty great thwack can produce a much more snappy snare drum sound. Both hits are activating the same trigger, but at different levels.

So it was, with all this in mind, that I reached for my trusty multimeter to find out where each cable went to in the D-Type connector block, because that will affect how the digital ‘brain’ receives the signal, and therefore what default sounds it will assign to the pads themselves. If you want to make your own custom 25-pin connector, it’s as well to know which pins go where. There are videos on the internet where people customise the wiring loom by cutting each cable and adding a jack socket to make it easier to manage routing all the wires around the drum set ‘frame’. Here’s one:

This makes it much easier to handle the wiring on the kit itself, but takes a bit of bravery, given that a new wiring loom would set you back about £70, depending on where you shop if you make a mess of it. You also need to be able to solder, or know someone who can.

I guess I was just plain curious about all this and want to know where things went. It turns out, it’s not what you might think! Looking at a 25 pin D-type connector there are two rows of pins, with 13 along the top row, and 12 along the bottom. Starting at pin 1 and simply going along each pin, allocating a pad and a connection would be logical (Kick drum, T, then R, then S, for example), but it turns out that it’s not quite that simple.

It all starts off like that – Kick drum, then snare, then Hi-Hat and controller, but check out the T, R and S… not exactly a simple sequence, almost as if someone was not paying too much attention when putting the very first one together. And what happened to ‘Crash 2’? Very odd layout, in my opinion.

Also, check out pin 15. It doesn’t appear to be used at all, whilst pin 22 has a double connection – and there could be two possible explanations for this. One might be as simple as allowing for expansion later, although these looms have been around for a fair while now, and in the same configuration for all kits, regardless of pads and numbers of triggers. The other explanation could be that ‘back in the day’ printer cables used pin 15 for error reporting, and this legacy is why pin 15 on the Roland loom doesn’t get used for a pad signal.

You’ll also wonder why it is possible to double the connection on pin 22, but not on other pins. The doubling up is for the sleeve on both pads, and as we know that is a ‘ground’ connection which does not carry a signal for a sound to be assigned. But what if we doubled up ALL of the ground connections, how many more pads could we put on a kit? Well, apart from the one already coupled, there are 8 more ‘sleeve’ connections which would release 4 more pins, and if one of those had to be a doubled up ground connection, three could be used for audio signals – meaning there is at least one more dual zone pad, and one more single zone pad possible. So why didn’t Roland do this? I am speculating that at the time the wiring loom was designed, the format of electronic drums was fairly well set, and ever since then Roland has kept all pads they make to be compatible with all of the different ‘brains’ or modules. In an attempt to maintain this compatibility, the very first cable looms are now the pattern, even for the quite different modules and possibilities that we have today. It would be possible for ALL of the ground wires to be combined into far fewer pins, and connect those ground pins to a common ‘rail’ inside the module itself, thereby enabling a far bigger drum kit to be created, and fewer restrictions on the drummers who want to expand their setups. Of course, nothing is that simple, and whilst I don’t actually know the real reason behind this curious pin arrangement, I am sure the good folks at Roland will have an explanation!