One of the slightly annoying things about Aperture is the limitations placed on you when creating a book. Whilst it is incredibly flexible in lots of ways, certainly much more than iPhoto, there are some things I really want to be able to alter.
One of these is the colour scheme in the ‘Special Occasions’ Aperture Theme. By default, you get a pale blue colour for any panel not holding an image. It looks quite smart, and the ‘helvetica Neue Ultra Light font is smart too… but I often find I want to change it. The trouble is, Aperture doesn’t let you do so easily.
Of course, if you fancy digging around in the files for the app then almost anything is possible! It’s not exactly easy, and you should always make a copy of the theme and work on that rather than jigger around with a perfectly good one and break it, but all you need is an eye for colour (and design?) and a decent text editor. I use BBEdit, but you can do equally well with the free Text Edit that comes with your Mac.
First things first – what I am about to do is not recommended, and I take no responsibility for how your system runs after you try it 🙂 Seriously though, work on a back up copy of the theme, and you can always delete it later. Also, it is likely that even if you do change things now, any update to the software could well over write your hard work… this tutorial works with v1.5 of Aperture. Apple have only this week released v2 as an update and it boasts new book themes and capabilities. It seems like a good time for me to play with the current version I have got installed, then!
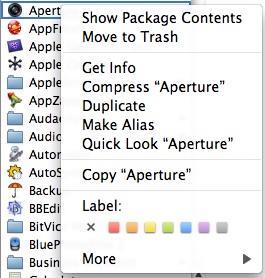 You find the book themes by control-clicking on the aperture application icon (in your Applications folder) and selecting ‘Show Package Contents’ . Navigate to ‘Contents/Resources’ and scroll down to the folder ‘Book Themes’. It’s probably quicker to type ‘book’ as you won’t then have to scroll – the finder will jump to the items with those letters at the start. You’ll then see the themes nicely lined up. Select the one you want to alter and make a copy of it (by holding down ‘Alt’ and dragging the folder to the bottom of the list). You can see that I have copied my ‘Special Occasions’ theme and renamed it ‘Alternate Occasions’. A word of caution – simply renaming the folder won’t give you a new theme name inside Aperture. It *will* list it alphabetically in the theme browser, but the theme list will show two copies of ‘Special Occasion’. We’ll get round to renaming things a bit later on.
Now you have the copy, open the folder and have a look. In my case, the first folder is called ‘Hardcover’ and everything else is in that. The things you may want to change are likely to be the fonts you can use and the colour of the bocks. For the fonts, look for the ‘TextStyles.plist’ file and open it in your text editor. What you’ll see is a series of XML statements which define the fonts in use, the size of them and the colour/style.
Changing Font Colours

I would leave the ‘Title’ key values alone. these are referenced in lots of other places and changing them here means an awful lot of editing elsewhere. You can also easily change the font in Aperture without needing to edit things here, but these keys control the default settings for the book, so you might want to tinker a little. Changing the default font is simply a matter of changing the key by typing in the name of the font you want to use. I have changed from ‘Helvetica Neue Ultra Light’ to ‘Garamond’.
You can also change the font colour in the last line of the set. These are actually RGB values with a fourth value set to ‘100’. RGB values are from 0 to 255 in each channel, with 0 being no colour, and 255 being maximum colour for each channel. Thus, a value of ‘255, 255, 255, 100’ would give you white text. Similarly, ‘0, 0, 0, 100’ gives you black text. If you have access to Photoshop or any other decent image editor, you probably already have a good idea how these things go. Again, you can easily change the colours of the fonts in Aperture without editing this file, but if you want to set up a new default, set the line as you need it to be.
In some areas kerning may be set, too. If you don’t know about kerning, leave this set as you find it!
Changing the colour blocks
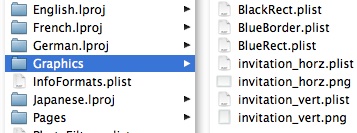 If changing the fonts is not enough for you, how about finding the colour blocks and changing those? Open the ‘Graphics’ folder and look at the files there. The one I am interested in is ‘BlueRect.plist’. open this in the text editor and you will see a very much more simple set of code. All you need to do is change the value for colour, using the same system as above. For example, if you want a pale lilac block colour, set the values to be ‘235, 222, 241, 100’. Again, if you use Photoshop you can find these values very easily – use the colour picker tool and open up the colour setting dialogue. Move the target around in the colours and watch the RGB values change. When you have the colour you want, note the values and set them in the text file… easy!
Changing the Theme Name
So far we have been tinkering with the fonts and colours. You have already renamed the theme folder copy and when you make your book in aperture you get the new theme in the list of available books, but the name has stayed the same (despite renaming the folder). You can rename the theme so that it appears as you want in Aperture by simply opening the ‘Localizable.strings’ file found in the relevant ‘.lproj’ folder for your language. In my case, I open the ‘English.lproj’ folder where there is just one file. Open it in your text editor and look at the top of the file for the ‘Theme Name’ setting. Change it as you want and you are ready to go. You don’t need to change anything else in this file for the new theme to work.
Updating the Preview Image
Finally, to make your new theme easy to spot and have a nice icon from within Aperture, open up the ‘Preview.tiff’ file in your favourite image editor and make it look like your theme – change the colours, fonts or whatever. Even change the images to help identify it a little more. Save it back to its original location and you are done.
Restart Aperture
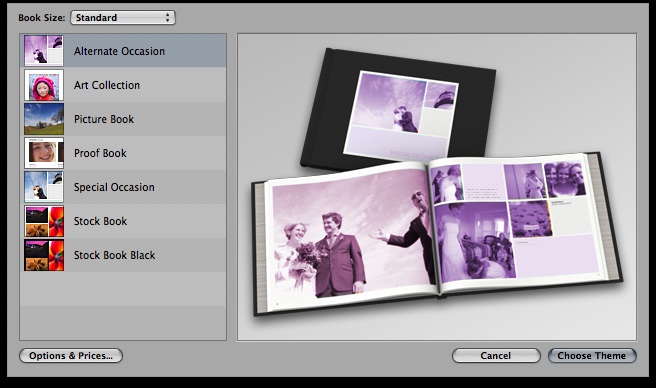
In order for your changes to show you need to re-start aperture. When it is running, try adding a new book and look at the list of options you now have. If all has gone according to plan, you should have your new theme showing in the list, ready to use.
If you combine your new theme colours with the existing ability in aperture to create new master pages then you have the opportunity to create some radical new layouts and over time I hope many people do.
Want to share themes?
Now you know how to edit your Aperture themes, why not provide a few for others to use? If ever there was an application crying out for additional content, this would be it, in my opinion! To get a new theme running, simply unzip it, put it in the ‘Book Themes’ folder and start Aperture. To get things going, have a copy of my ‘Alternate Occasions’ theme. It hasn’t changed much, just a font and colour change, but there is plenty more that could be done to make it more attractive. Over time, as new things change, I’ll update the file here.
Have you tried to get one of the altered templates actually printed? Will Apple do that? Will the colors be accurate or off? Sure, you can change anything this way, but is the printing service set up to do these off colors? Has anyone tried?
As I have not actually printed an altered theme I can not stand by what I am about to say but with that disclaimer out of the way I think this should work. Reason being I believe Aperture works by creating a high quality PDF file which is then uploaded to the printer for printing. You should be able to confirm your changes appear in the PDF proof before uploading. I believe Apple is using a pretty straight forward digital printing process which should accommodate any changes that make it through to that final PDF.
I haven’t re-tested this in Aperture 3.0 but I did very similar modifications to the special occasions theme back in Aperture 1.x with great results. Mr. Bowles is correct, Aperture is just creating a full-bleed PDF document for upload to their book printing service and the proof PDF you get is pretty much dead on WYSIWYG.
It seemed ludicrous to me that Apple wouldn’t (and still doesn’t) give you access to change the color blocks in the Special Occasion theme. In both cases that I’ve used this theme I’d shot a wedding and wanted to coordinate the color blocks in the album with the color palette / theme of the wedding.
Pingback: Book Themes | More More Pics
I’d like to have the background colors for the Formal Theme available to use in the Stock Book Theme, which only provides a white background. Can you advise if or how this might be accomplished? I want to use Stock Book Theme because it automatically tags the file name for each photo in a nice tiny font, but I’d like to use colored backgrounds to distinguish one section from another in my book.
This is a great tutorial. I agree that it’s so frustrating not to just have a colour palette within Aperture to do this. On the other hand, doing it manually like this, at least you get the control to coordinate with the theme of a wedding, which was what I needed to do. Thanks!