If you’ve found this post it’ll be because like me, you had issues setting up WordPress to run on AWS. However, it does work, and if you solve each of the issues one by one you’ll get to see WordPress running efficiently and well.
First off, some basics. I am using Linux, v 20.04. It has MySQL 8.0.22 and PHP 7.4.3. I updated to WordPress 5.6, and found a few things not running any more.
1 – plugins – some incompatibility, and requiring updates, but auto update didn’t work. Worse, WordPress asks for FTP settings so I can have it manage the process, and I am not about to install FTP onto the server.
2 – email sending used to be fine, but now no longer runs as it used to
3 – editing any text, anywhere was a problem – the changes could not be saved
4 – ReCaptcha not appearing on forms.
Auto Update
WordPress used to be painful to update. Years ago it involved logging on to your server, creating backups, copying files over the top of existing files and directories and hoping for the best. Nowadays it is a lot easier, and in the WordPress dashboard you should be able to simply click a button and get the updates.
However, when you do, you are presented with the WordPress FTP panel asking for a hostname, username and password, and giving you the option of FTP or SFTP. Neither worked at all for me, ever. And no chance of working on AWS either because of the use of PEM (or PPK) security files to actually log in to the server. WordPress has no way of handling those, so it simply won’t work. Fortunately, all you do is make a small edit to the wp-config.php file on your server and the FTP dialog disappears.
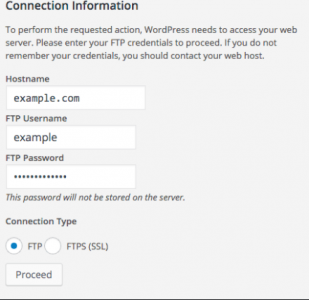
To get rid of this, you’ll need to edit your wp-confg.php file and add a simple line of code. Some people say add it at the bottom as the last line, but I found that didn’t work. Instead, I added it to be just above the database connection settings:
define(‘FS_METHOD’,’direct’);
In the latest WordPress versions, it’ll be about line 22 or 23. Add it in before you get the database definition statements and save the file.
When you next try to auto update you’ll see no FTP dialogue box.
What this addition does it tells WordPress to use a ‘direct’ method of writing to the server, and not use FTP. However, there may be a second issue for you when you do this.
File Ownership and Permissions
Whenever you move files onto a server, they are given certain attributes, and on Linux these will include who owns them, and who has permission to modify them. You may think of yourself as the owner, and you’d be right… but the server itself runs certain applications (such as your web server – probably Apache or NginX) and each of these is like you – they have a role on the server to do their job, so the server considers them also able to own and manipulate files.
The second thing to remember is that you as a user exist on the server in a ‘group’ which has certain privileges. Other users can exist in this group too, and the group has overall permissions. If you upload files, they also belong to the group and have the permissions afforded to the group. For example, let’s say your login to the server uses a name ‘Ubuntu’ – then the files belong to ‘Ubuntu’ and are in the group for ‘Ubuntu’. The problem is, the web server isn’t in that group, so can’t get to the files to do what WordPress needs. Whilst you can read and edit them because you are in that group, no-one else can. They may be able to read them, but writing changes? That is not going to be allowed.
So you have to make sure that WordPress has the ability to read and write to the files, but that the files are protected from malicious actions. Fortunately, it’s not too hard to achieve and there are many resources on the web telling you the exact file and directory permissions to use. However, you must ALSO grant the web server the right to use the files if you want WordPress (which uses the web server to do the work) to be able to update them.
In the world of Ubuntu, the Web Server is given a name and group called ‘www-data’.
You therefore need to change the owner and the group for each of your WordPress files and directories, and maintain the overall security using the file permissions. Don’t worry, you’ll still be able to access and edit them yourself if you need to, but mostly, you won’t have to.
Open up your terminal and connect to your server, and navigate to your WordPress installation. All of the files and folders within it need to be assigned to the www-data user:
chown -R www-data:www-data /var/www/html/wordpress
This literally means ‘CHange OWNership Recursively to be owned by www-data and in the group for www-data in the directory where WordPress lives. Note that the location I’ve shown in this example (/var/www/html/wordpress) may not be the same on your server.
If you log in to your WordPress Dashboard after making these two changes (using a direct method of update and getting the permissions right) you should have the ability to auto update your WordPress site without resorting to logging in to the server directly. It can all be achieved from within your Dashboard, and that’s a lot simpler! If you do want to edit the files in the server directly, you’ll find you no longer own them, and so will need to log in as the root user or use the ‘Sudo’ command to access them.
Email Sending
It used to be quite simple to send email from WordPress on any other server except AWS, it just worked. However Amazon in their wisdom have prevented you sending email directly, because they have blocked port 25. This is the port that SMTP uses, and so mail cannot leave your server. It’s a great way to reduce the chance of AWS servers being used for Spam and Spam relays, but it’s a nuisance for those of us just wanting to host a site and have it send out alerts and messages. You have two options:
1 – contact Amazon from your console panel and ask them to lift Port 25 restrictions. They do listen, and are sympathetic, but not daft. You may wait a day or two before it is done, and when it is done they may apply other requirements.. such as using their Simple Email Service (SES) to ensure Spam and malicious emails are under control.
2 – use a different SMTP relay which goes through a different route. There are many such services on the web and all you need to do is install a suitable WordPress plugin to allow you to bypass the built in functions and use your SMTP server such as Google, or any other mail service.
Look for ‘Easy WP SMTP’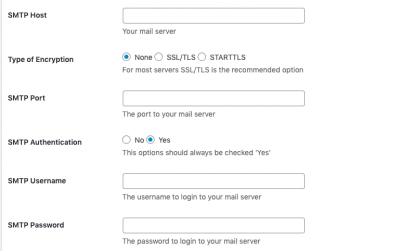 as a plugin which gives you many options and the obvious ones for SMTP. Just put in the details required, and WordPress will route your mail out that way. Keep in mind that port 25 is not the only way to send mail, and different providers use alternatives, such as 587. This is fortunately not blocked by Amazon, and so email will once again ‘just work.
Text Editing
The latest version of WordPress continues with the ‘Gutenberg’ text editor, which when running well, works nicely. However, I had the problem of it not updating the text, and I miss the old ‘classic’ editor I’ve come to love. Luckily, you can restore the old editor, and get that retro feel, and at the same time fix the errors in Gutenberg.
It’s another plugin, this time called ‘Classic Editor’. Just install it, check the settings and enjoy text editing working once again.
ReCaptcha
If you have ever used WordPress before you’ll know how much of a target it is for security. It is so important to keep things under control, and that includes your forms and other places where users can write content on to your pages.
I use the Contact Forms 7 plugin which gives me a nice simple interface for creating any number of forms that I might need, and also now supports Captcha from Google. You’ve all seen these – small puzzles that you must solve before accessing or sending content – often involving traffic lights, or pictures of store fronts.
The problem was when I updated Contact Forms, the captcha just didn’t appear. In earlier versions it was completely removed, but the ability to use Captcha was reintroduced and it is worth using it to prevent a lot of problems with forms and content entry being taken over by bots. So I was dismayed to lose the captcha, and did a bit of investigating. there are two types of Captcha – v2 and v3. The latest version of Contact Forms uses v3 by default, and so you need to provide v3 credentials. Go to Google, sign up for a ReCaptcha account and add an entry for the domain you want to protect. Enter the secret key and public key Google gives you in the WordPress plugin and you are nearly done.
You also have to add the reCaptcha to your form layout.
You also need to make sure that the version of PHP that you are running has the right libraries to support it!
Let’s add the code to the form layout. Here is a simple example of a contact form using the ReCaptcha codes (WordPress short codes). Check the last but one line: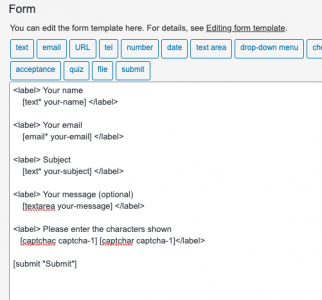
Note the codes in this version I am using
[captchac captcha-1] [captchar captcha-1]
This is calling two parts of PHP from your server in order to create the effect. Firstly, Captcha uses an image and secondly it needs you to type text. If you don’t add this into your form, then Captcha won’t show.
When it is added, the captcha appears under your form, as in the template layout.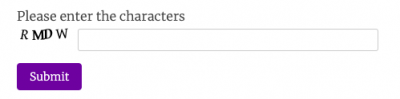
By far the biggest issue for me was the file permissions and ownership, and once that had been done the auto-updates just worked. But also, the auto install of new plugins, removal of old ones, pretty much everything I want to achieve is possible from within WordPress now. No longer any need for me to log into the server and use the tools built in there, and this means keeping WordPress up-to-date will be easier, so there’s less of an excuse not to!
A brief word on security.
WordPress has long been the target of attacks on servers and is one of the main reasons for server slow down and other problems. It is such an issue that you need a robust security plan to be in place when you run WordPress. Fortunately, there are many plugins to help, and you will no doubt have fun reading reviews on them all, but I am much more relieved to see some significant improvements to security tools built right into WordPress and available to any administrator to see the issues and possibly to fix them too.
The WP Security tab is a huge step forward, in my opinion.
I am not a server administrator, and am not really familiar with of all the nasty things hackers can do, but at least there is some comfort from knowing I have better tools to help me now than I had when WordPress first came out all those years ago. I’ll keep using it for a while longer, I guess!
Happy ‘pressing!